Search the entire website
Search
Search the entire website
The core reason for nail art warping and falling off almost always points to the same problem: nail surface treatment is not in place. Specifically, it is often because there is still dead skin that is difficult to detect with the naked eye on the nail surface, or the dehydration of the nail surface is not complete.
When the nail polish is directly covered with oil, water or dead skin, rather than tightly grasping the keratin of the nail itself, this adhesion is very fragile, and stratification or warping will occur within a few days. In addition to, brushing too thick, forgetting to “wrap” , or accidentally letting the nail polish overflow and flow to the finger skin, these operational errors will inevitably lead to peeling.
To keep your nails strong for more than 3 weeks, you must make sure that the nail surface is completely dry, polished and free of any dead skin residue before the primer touches the nails.
Many novices—and even some practitioners—mistakenly believe that the Proximal Nail Fold (often mistakenly called the cuticle) at the base of the nail is simply pushed away to complete the pre-treatment. But the number one culprit that causes warping is actually the invisible dead skin that still stubbornly adheres to the nail surface.
The so-called “Cuticle” is actually a thin film of transparent dead skin cells that has fallen off from below the nail fold and is tightly attached to the deck. If you apply nail polish directly to this invisible film, the gel will stick to dead skin instead of stable nail keratin. Because the skin will naturally metabolize and fall off, and it is easy to hide dirt (grease), the nail polish will eventually peel off with dead skin, leading to warping.
In order to obtain a lasting bond, you must meticulously remove these tissues so that the nail polish can act directly on the solid nail structure.
Even if you clean up the dead skin, the natural oils and moisture that come with your nails are still a barrier to adhesion. A chemical common sense must be emphasized here: nail polish is hydrophobic and it hates water and oil very much.
If you apply a primer to a nail that has not been completely dried or that still has oil residue, it is like creating an artificial “sliding layer” between the nail and the product “. In this case, chemical bonds cannot be formed at all.
The perfect pre-treatment requires that we must remove these contaminants and ensure that the nails are “completely dry” before brushing. This creates a clean canvas that allows the gel to grip the nail fibers undisturbed.
In addition to pre-processing, the brushing effort on your hands also has a huge impact on durability.
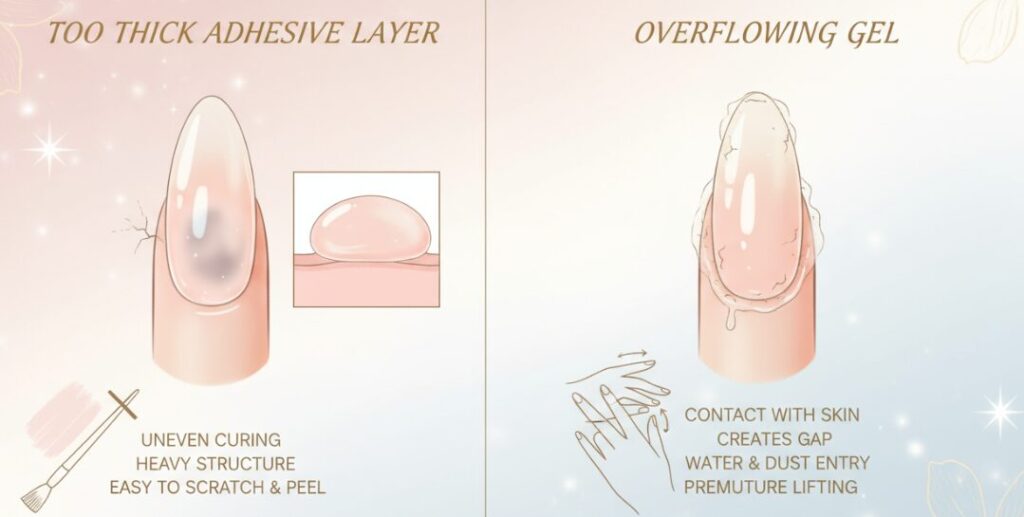
Fingertips are the most stressed parts in our daily life. From typing on the keyboard to opening cans (although I always recommend not using nails as tools), fingertips are under pressure. If you do not carry out “hemming” treatment, it is equivalent to exposing the most vulnerable part of your nail art.
Edge wrapping is to use the brush head to sweep the front section of the nail to wrap the gel around the edge of the nail. This seals the layers of glue together to form a protective “bumper”. Without this sealing step, the edge of the nail polish will stop right at the edge of the nail. Daily friction will cause the gel to retract back, and within a few days you will notice those annoying little gaps in your fingertips.
To solve the puzzle of why my manicure falls off so easily, you have to look at the bond between the product and the nail.
The goal is for the nail polish to adhere directly to the keratin of the nail. By polishing the nail surface (increasing the physical attachment area), completely removing dead skin, and ensuring complete dryness, you can eliminate the obstacles that cause weak adhesion—oil, water, and dead skin tissue.
Fix these pre-steps and polish your painting skills. Your nail art will collapse in a few days to a professional-level work that will last for more than 3 weeks.
Author:Elena Russo
Hi, I’m a licensed nail technician and educator passionate about nail chemistry. With over a decade of salon experience, I specialize in solving retention issues by focusing on meticulous nail plate preparation. I wrote this guide to help you master the art of dehydration and adhesion, ensuring your gel manicure lasts 3+ weeks every time.